Items posted on the main page are available for purchase unless otherwise indicated. If you'd like to purchase an item shown, send me a message indicating which country you live in and I'll quote you a shipping price. All payments are processed through Paypal only. If you're looking for a custom item, let me know the specifics and I'll quote you a total price. Custom items typically take 6 weeks to produce after payment is received. Keep this in mind when asking for custom orders.

Wednesday, May 28, 2025

7 Easy Sewing Projects for Beginners That You'll Actually Use


Are you just getting started with sewing or looking for a few quick wins to build your confidence? Whether you're working with a brand-new machine or dusting off one that's been in the closet for years, diving into beginner sewing projects can be exciting, rewarding—and even a little magical.

At Aislin’s Designs, we believe handmade is heart-made. Here are 7 simple and practical sewing projects that are perfect for beginners and guaranteed to bring beauty and usefulness into your daily life.
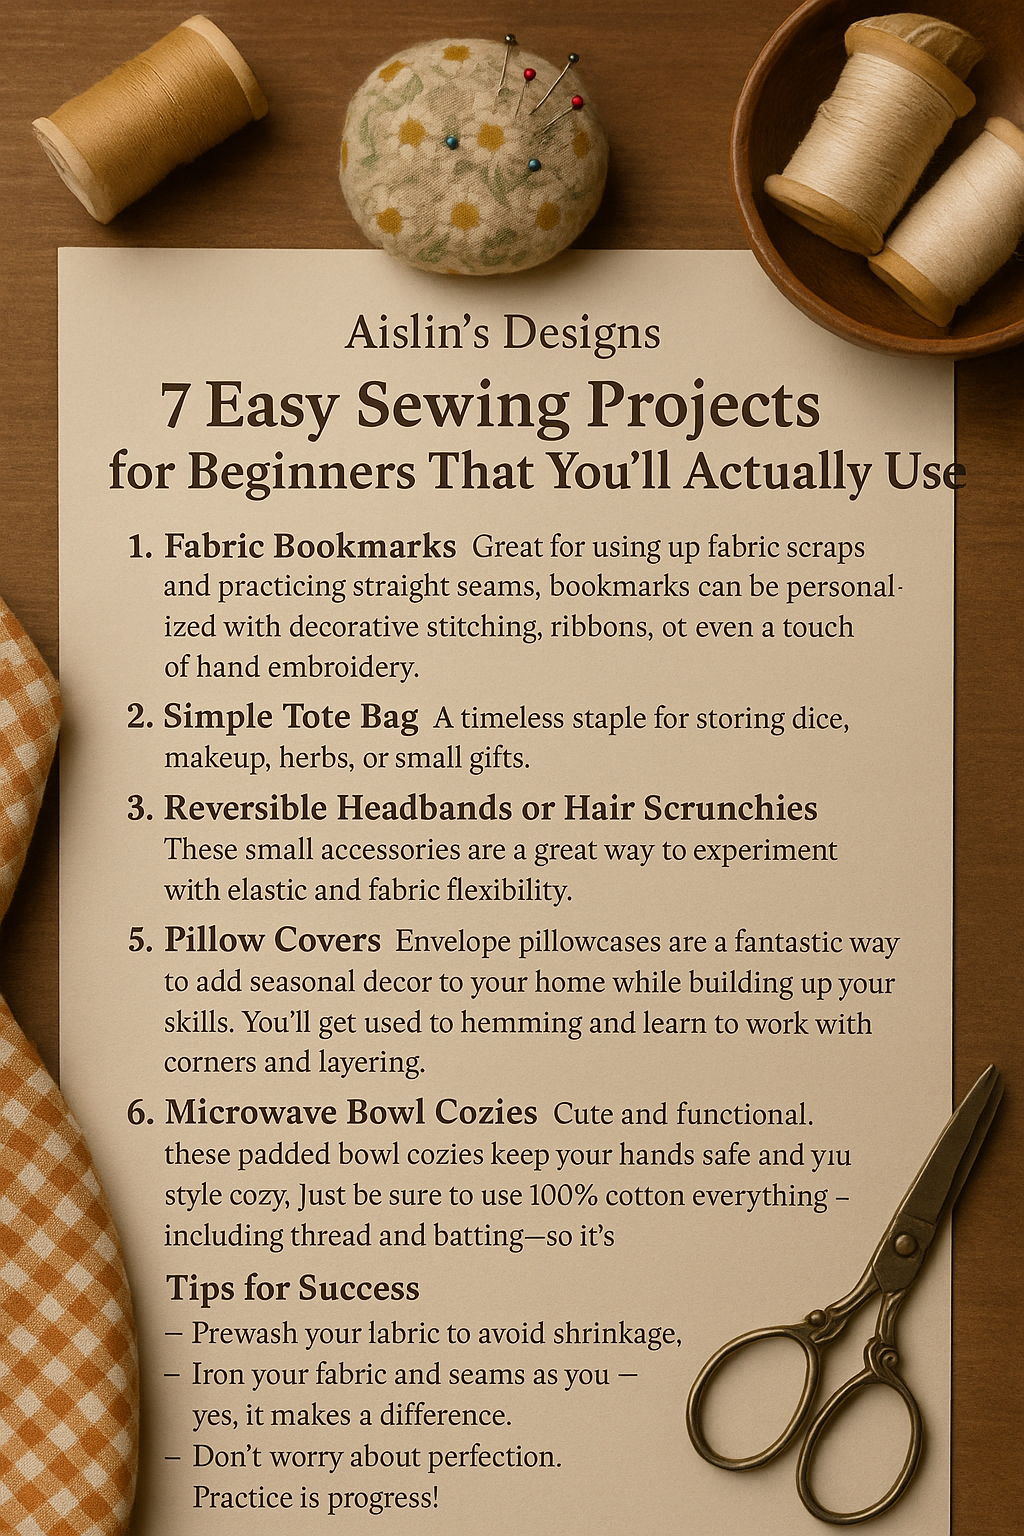

1. Fabric Bookmarks

Great for using up fabric scraps and practicing straight seams, bookmarks can be personalized with decorative stitching, ribbons, or even a touch of hand embroidery.

2. Drawstring Bags

A timeless staple for storing dice, makeup, herbs, or small gifts. Drawstring bags are beginner-friendly, teach you about casing and seams, and are endlessly reusable.

3. Simple Tote Bag

If you can sew a straight line, you can sew a tote! A basic tote introduces box corners and gives you a practical result you’ll want to use every day—from library trips to yarn runs.

4. Reversible Headbands or Hair Scrunchies

These small accessories are a great way to experiment with elastic and fabric flexibility. Plus, they're fun to gift or swap with friends.

5. Pillow Covers

Envelope pillowcases are a fantastic way to add seasonal decor to your home while building up your skills. You’ll get used to hemming and learn to work with corners and layering.

6. Microwave Bowl Cozies

Cute and functional, these padded bowl cozies keep your hands safe and your style cozy. Just be sure to use 100% cotton everything—including thread and batting—so it’s microwave-safe!

7. Pin Cushions

Make them square, round, or novelty-shaped. Pin cushions are a great way to try stuffing techniques and small-scale sewing, and you’ll use them constantly in your sewing journey.


Tips for Success

  • Prewash your fabric to avoid shrinkage.
  • Iron your fabric and seams as you go—yes, it makes a difference.
  • Don’t worry about perfection. Practice is progress!

Final Thought

Sewing is a skill built stitch by stitch. Whether you’re crafting with a purpose or just enjoying the rhythm of the needle, every handmade project tells a story. Start small, stay curious, and let your creativity bloom—one project at a time.

Happy stitching,
The Aislin’s Designs Team

Monday, May 26, 2025

The Magic of Handmade


In a world that moves fast and favors convenience, making something with your own two hands is a quiet kind of rebellion. Whether you're knitting a scarf, sewing a dress, or crocheting a baby blanket, you’re weaving magic into every stitch.

It’s not just about the finished piece. It’s about the rhythm of the work, the soft click of needles, the hum of the machine, the gentle curve of a hook pulling yarn through loops. It’s about creating something that didn’t exist before you started.

Handmade means heartmade.

Even when the seams aren’t perfect or the yarn splits or the pattern makes no sense, there’s something deeply satisfying in the process. You’re not just crafting a project—you’re creating comfort, expression, and legacy.

So don’t worry if it’s not Pinterest-perfect. Embrace the uneven edges. Celebrate the dropped stitches. They’re part of the story.

Because every handmade thing carries a little piece of the person who made it.

And that’s the most beautiful kind of magic there is.

Monday, January 25, 2021

Sewing a Corded Seam

If you want a really cute and decorative seam that stands out, consider a corded seam. This type of seam is often used as a design feature and looks stunning when you use a fabric or color that really sets off the entire project. Try this on pillows or skirts first, then get more adventurous and add it to shirts, quilts, and anything else you like.

The options for the 'cord' part of your seam are endless. The easiest thing to do is just cut a strip of fabric that you like, but you can actually buy cording for seams if you like. I tend to prefer just working with fabric, but it's really up to you.

Unlike some other seams, to sew a corded seam you do not start with a plain seam. Instead, you have to create the seam with the cording already in place. To make your cording, cut a strip of fabric as long as the seam and a little bit wider than double the seam allowance. So if you're going to leave ½" seam allowances, the fabric should be just over 1" wide. How much wider depends on how prominent you want the cording in the finished product. I like a very discrete cording, so I'd cut a piece of fabric that is 1¼" wide. You can go wider, if you like.

Now that you have your fabric strip, you can start your seam. You'll need pins to keep everything in place, so make sure you have plenty on hand. The key to a corded seam is to line everything up and pin it all in place before you start. You'll be lining up the raw edges of the seam allowances of both your project and your fabric strip. The seams of your project go right sides together, but the fabric must go in between. Fold your fabric strip in half lengthwise, wrong sides together. This is important. You want the right sides of the fabric strip facing outward.

Now that you have your folded strip, you can place it in between the raw edges of the seam allowances of your project. Line everything up perfectly and pin in place. You don't want anything to slip. Stitch as you would a plain seam, ½" from the seam allowance. Go carefully and straight, making sure you're catching the cording while you sew.

This technique can be used to apply many types of decorative trim. You can apply cording, yes, but also lace or any trim that has enough of an edge to slip between the fabric of whatever project you're working on. The possibilities are endless.

Monday, January 18, 2021

Sewing a Double Topstitch Seam

A double topstitch actually adds a little structure to your project, unlike some of the other decorative seams. It's definitely more stable than the more common topstitch seam. Of course, it does take a little more time. It takes double the time, actually, because you have to stitch down both sides of the seam allowance. But it works well and is worth the little extra time. Besides, it's not exactly a complicated stitch.

Like so many decorative seams, you're going to start with a plain seam. Press the seam open. Make sure the plain seam is perfectly flat. The finished product will look better the smoother the original seam is. When it's as flat as you can make it, topstitch on each side of the seamline about ⅛" from the plain seam. Make sure the distance from the plain seam is the same on both sides.

You can venture further from the seam, if you like. You can even go up to ½" away from the plain seam. But be careful and make sure you catch the seam allowances while you stitch. Don't miss them. If you do miss them, you'll have to unpick the entire topstitch line and start again. It's a decorative seam, after all. It's designed to look nice.

This seam is simple and easy and makes a pretty little addition to a variety of projects.