Items posted on the main page are available for purchase unless otherwise indicated. If you'd like to purchase an item shown, send me a message indicating which country you live in and I'll quote you a shipping price. All payments are processed through Paypal only. If you're looking for a custom item, let me know the specifics and I'll quote you a total price. Custom items typically take 6 weeks to produce after payment is received. Keep this in mind when asking for custom orders.

Friday, July 15, 2016

Sewing a Self-Bound Seam

There are so many seam finishes out there it can be difficult to decide on one. The decision is typically made based on the type of fabric and the exact look you're going for. If you're hoping to hide all your raw edges by enclosing them, and your fabric is sturdy and does not fray easily, or at all, you might consider the self-bound seam.

Start by ironing your seam in the expensive position. This will help keep you from accidentally clipping both sides of the seam allowance. When it's nice and flat, trim one side to about 1/8". No more than that, but not really less than that either. You'll need the room.

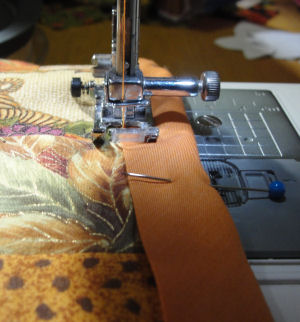
Once that's done, fold under the opposite seam allowance and press carefully. Fold it under again and press again. Then take the trimmed seam allowance and slip it inside the folded seam allowance. Take your time and make sure everything lays flat along the entire length of the seam.

When you're prepared, stitch the seam closed. Stay as close to the folded edge as possible while still catching all layers of the seam allowance. Once you're done, press flat and go.

Friday, October 30, 2015

Halloween Costumes: Cleopatra

I love making Halloween costumes, especially when they're for children. This item was one of my favorites. Because I was working with the child in question, we decided to throw out historical accuracy and focus instead on what she wanted in her own costume. Please note: in the picture the little girl is wearing a thick sweater under the dress. Hey, it's really cold where we live and everyone was about to leave for the annual trick-or-treat. If the costume was to be worn indoors, the arms would have been bare.

To begin, we chose a brilliant white satin for the base gown. Because this had to fit over a snowsuit (we're usually buried under snow by the end of October), we had to make the gown a couple sizes larger than normal. We also had to make sure it was short enough for her to climb over a snow bank if she had to.

When it came to the cape, she picked a gold taffeta. Because I was dealing with a child, I made sure the cape could be easily removed. Children love capes, but only until the capes are annoying. Then they want the capes off, so the cape only loops around the neck (under the collar) and has loops to hook over the wrists. This makes it easy to take off.

Children take forever to make up their minds, so we were running out of time before Halloween. So instead of making the collar and belt from scratch, I purchased them, took them apart, and put them back together again. Why did I do this? Well, let's face it. Nothing I purchased would match exactly. So I needed to add a few new touches. A slightly different fabric and a few gems and gold pieces (not real, of course; she's just a kid) later and she was ready to go. Well, after the makeup and wig were applied.

I might have done a few more things to the costume and even used different fabrics, but she was very happy with it as it was. Since that's what matters to me, that's what we went with. I'm hoping to make another Cleopatra costume, a more deluxe version, in the future. Maybe next year.

Friday, August 14, 2015

Sewing a Tricot Bound Seam

If your fabrics are sheer or especially delicate, a bias tap bound seam may actually be too heavy. In this case, you may want to bind the seam using tricot, which is a lighter and more delicate fabric. It will work well with other fabrics of a similar weight.

To sew a tricot bound seam, cut a long piece of tricot about the width of the seam allowance. Fold this piece of tricot strip in half lengthwise and encase the raw edge of the seam allowance. Stitch along the edge of the tricot strip using either a zigzag or a straight stitch.

Remember to press your seam open before beginning. Also make sure the tricot you're using won't shrink when you wash the garment or item in question. When in doubt, pre-shrink your fabrics before you begin.

Friday, August 7, 2015

Sewing a Bias Tape Bound Seam

Fabrics that fray so quickly and completely that they'll practically disappear on you typically benefit from an enclosed seam. The most common enclosed seam is a bias tape bound seam. this type of seam finish works well for easily frayed fabrics, fur, and unlined jackets that you need to give a professional look to. It's also fairly easy to pull off if you have some coordinating bias tape lying around. If you don't, head off to your local store and buy some. Make sure you've measured your seams and added up how much you'll need so you don't need to make a second run.

Now that you have your bias tape, it's time to enclose and finish your seam. Start by pressing your seam open. Then encase each raw edge with the bias tape, pinning carefully so you'll catch both sides of the tape and the fabric when you sew the seam. Stitch close to the folded edge of the bias tape, making sure you're not missing the tape on the other side. Once you stitch both sides of the seam, you're finished.

You can make your own bias tape, if you like. This is done by simply cutting long strips of fabric and folding and pressing so that it is folded just like bias tape. Examine a piece of bias tape to see how it's folded and you'll discover making your own out of whatever fabric you wish isn't hard.

Whether you make it or buy it, make sure to wash and dry the bias tape before you use it. Nothing is more irritating than having your bias tape shrink once you've already finished your garment. So always, always pre-shrink your bias tape.