Seams may appear straightforward, but they can be tricky things. Not in the sewing of them, because that's quite easy, but in deciding exactly what type of seam might be most appropriate. You might need a common seam, such as a clean finish seam, or an enclosed seam like one bound in bias tape. Perhaps an overlock or a French seam would suit you better. But how do you choose? Well, that depends on the type of fabric and the item you're sewing, of course.
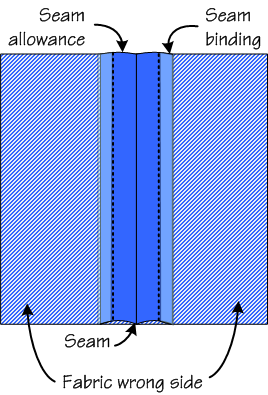
If you're using a heavyweight fabric, and if the item in question is an unlined garment, you might decide upon a Hong Kong seam. This finish totally encases the seams, giving your garment a pretty, almost couture, finish on the inside. It should be noted that this particular seam finish works only on straight or moderately straight seams. Curved seams have to be notched to lie properly, and the notching means that a Hong Kong finish is not really possible.
But if your seams are mostly straight, and your seam is pressed open nicely, you can cut a continuous length of bias tape. The tape should be a full inch wide, maybe even a little wider, and it should be pressed open. This may seem a little wide for a seam, but the extra width gives you much needed excess when you start working on the wrong side of the seam. You can always trim it down later. You don't have to use actual bias tape. You can cut your own strips of fabric to use if you want something coordinated to the fabric you're using. Maybe even use remnants of the main fabric, or a pretty silk to make your seams even prettier. It's up to you. If you're cutting your own strips, 1½" is probably the best width to work with. Remember, you will be able to trim it later.
With the seam pressed open, line up the edge of the bias tape with the raw edges of the seam, right sides together. Stitch ¼" from the raw edge, but only on one side. Now open up this new seam, revealing the right sides of both the fabric and the bias tape. Press open, then fold the bias tape under the raw edge and press again. The seam should now be enclosed in the bias tape. To secure, stitch in place from the top side, making sure your needle hits precisely where the fabric hits the bias tape. This is called the 'ditch', and stitching here should make your stitches all by disappear. Nice and neat. Trim off the excess and repeat for the other side of the seam. This is your Hong Kong seam.
Though this seam is a little more work than the less fussy bias tape bound seam, it is neater and exactly the type of seam finish you might need if you're creating an unlined garment where the seams will occasionally be seen. If you want to jazz it up even more, consider using silk or another fine fabric as your bias tape. Though this isn't necessary, a finer fabric enhances the finish and makes your garment appear designer. Which it is. Designed by you, anyway.
Welcome to Aislin’s Designs—a cozy corner for crafters who love sewing, knitting, and crochet. Here you’ll find patterns, project ideas, tips, and tutorials to inspire your next handmade creation. Whether you're a beginner or seasoned maker, there's always something new to stitch, knit, or hook. Grab your yarn, thread your needle, and let’s get creative together!
Items posted on the main page are available for purchase unless otherwise indicated. If you'd like to purchase an item shown, send me a message indicating which country you live in and I'll quote you a shipping price. All payments are processed through Paypal only. If you're looking for a custom item, let me know the specifics and I'll quote you a total price. Custom items typically take 6 weeks to produce after payment is received. Keep this in mind when asking for custom orders.
Friday, January 20, 2017
Friday, July 15, 2016
Sewing a Self-Bound Seam
There are so many seam finishes out there it can be difficult to decide on one. The decision is typically made based on the type of fabric and the exact look you're going for. If you're hoping to hide all your raw edges by enclosing them, and your fabric is sturdy and does not fray easily, or at all, you might consider the self-bound seam.
Start by ironing your seam in the expensive position. This will help keep you from accidentally clipping both sides of the seam allowance. When it's nice and flat, trim one side to about 1/8". No more than that, but not really less than that either. You'll need the room.
Once that's done, fold under the opposite seam allowance and press carefully. Fold it under again and press again. Then take the trimmed seam allowance and slip it inside the folded seam allowance. Take your time and make sure everything lays flat along the entire length of the seam.
When you're prepared, stitch the seam closed. Stay as close to the folded edge as possible while still catching all layers of the seam allowance. Once you're done, press flat and go.
Friday, October 30, 2015
Halloween Costumes: Cleopatra
I love making Halloween costumes, especially when they're for children. This item was one of my favorites. Because I was working with the child in question, we decided to throw out historical accuracy and focus instead on what she wanted in her own costume. Please note: in the picture the little girl is wearing a thick sweater under the dress. Hey, it's really cold where we live and everyone was about to leave for the annual trick-or-treat. If the costume was to be worn indoors, the arms would have been bare.
To begin, we chose a brilliant white satin for the base gown. Because this had to fit over a snowsuit (we're usually buried under snow by the end of October), we had to make the gown a couple sizes larger than normal. We also had to make sure it was short enough for her to climb over a snow bank if she had to.
When it came to the cape, she picked a gold taffeta. Because I was dealing with a child, I made sure the cape could be easily removed. Children love capes, but only until the capes are annoying. Then they want the capes off, so the cape only loops around the neck (under the collar) and has loops to hook over the wrists. This makes it easy to take off.
Children take forever to make up their minds, so we were running out of time before Halloween. So instead of making the collar and belt from scratch, I purchased them, took them apart, and put them back together again. Why did I do this? Well, let's face it. Nothing I purchased would match exactly. So I needed to add a few new touches. A slightly different fabric and a few gems and gold pieces (not real, of course; she's just a kid) later and she was ready to go. Well, after the makeup and wig were applied.
I might have done a few more things to the costume and even used different fabrics, but she was very happy with it as it was. Since that's what matters to me, that's what we went with. I'm hoping to make another Cleopatra costume, a more deluxe version, in the future. Maybe next year.
Friday, August 14, 2015
Sewing a Tricot Bound Seam
If your fabrics are sheer or especially delicate, a bias tap bound seam may actually be too heavy. In this case, you may want to bind the seam using tricot, which is a lighter and more delicate fabric. It will work well with other fabrics of a similar weight.
To sew a tricot bound seam, cut a long piece of tricot about the width of the seam allowance. Fold this piece of tricot strip in half lengthwise and encase the raw edge of the seam allowance. Stitch along the edge of the tricot strip using either a zigzag or a straight stitch.
Remember to press your seam open before beginning. Also make sure the tricot you're using won't shrink when you wash the garment or item in question. When in doubt, pre-shrink your fabrics before you begin.
Subscribe to:
Posts (Atom)