There are dozens of different seams you can use to finish a garment. Sometimes you'll use a French seam on a delicate fabric. Other times, you'll use a flat-fell seam to create strong and sturdy seams on a strong and sturdy fabric. But these seams are both enclosed seams. Useful, yes, but if you need to reduce bulk and create a more flexible seam, you may want to explore the world of overedge seams.
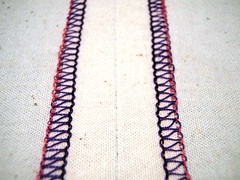
An overedge seam is finished with closed seam allowances and is typically quite narrow. One quick and easy option is the overlock seam. This seam prevents unraveling, making it perfect for knits and other stretch fabrics. To pull this one off, you need a serger, otherwise known as an overlock machine. Once you've sewn your seam, pass the raw edge through the serger. This will both finish the edge of the seam and trim the seam allowance. You can either feed each seam allowance separately and press open, or press them together and finish them as one. If you finish them as one, press the seam allowances to one side.
A serger can also be used to stitch the seam and finish the seam allowance in a single pass. To do this, you'll have to check your serger's manual for specific directions. It's not that difficult, but I still prefer to sew the seam first myself and then finish with the serger. Though doing it all at once may be a little quicker, I find the quality of the seam itself isn't as precise as I'd like.
The benefit of an overlock seam is that it will not fray. It really can't, not bound and trimmed the way it is. But this seam finish doesn't work well on delicate fabrics. Use it for knits and stretch fabrics and you'll be pleased with the results.
Welcome to Aislin’s Designs—a cozy corner for crafters who love sewing, knitting, and crochet. Here you’ll find patterns, project ideas, tips, and tutorials to inspire your next handmade creation. Whether you're a beginner or seasoned maker, there's always something new to stitch, knit, or hook. Grab your yarn, thread your needle, and let’s get creative together!
Items posted on the main page are available for purchase unless otherwise indicated. If you'd like to purchase an item shown, send me a message indicating which country you live in and I'll quote you a shipping price. All payments are processed through Paypal only. If you're looking for a custom item, let me know the specifics and I'll quote you a total price. Custom items typically take 6 weeks to produce after payment is received. Keep this in mind when asking for custom orders.
Friday, August 3, 2018
Friday, July 20, 2018
Sewing a French Seam
Lightweight fabrics can be difficult to seam, but this difficulty is compounded when the lightweight fabric is also sheer. You don't want the seams to look too much like seams, but you do need seams. If you find yourself in this position, you might want to consider a French seam, which totally encloses the raw edges and gives a neat and polished look. It is a little more work than a standard seam, but the finished product is worth the effort.
Start by stitching a plain seam with wrong sides together. The ideal seam allowance here would be ⅜". This gives you a little space to work with and makes trimming the seam easier. Once your plain seam is complete, trim the seam allowance to ⅛". Press the seam open with a warm iron. Then fold the fabric right sides together, making sure to fold directly along the stitching line. Press well and precisely. This is the key to a good and well sewn French seam.
Stitch ¼" from the fold, totally enclosing the seam allowance you previously trimmed. If you've done your job correctly, you shouldn't seem any of the raw seam allowance on the outside. It should all be enclosed.
On very lightweight fabrics like Swiss batiste, you might want to make the size of the seam even smaller. If you can trim the seam allowance even more and stitch ⅛" from the folded edge if you can manage it. This way you are sure to minimize the appearance of your seams. If you can't pull this off, don't worry. The standard French seam should work well enough.
Friday, February 3, 2017
Sewing a Mock Flat-Fell Seam
Heavier weight fabrics that tend to fray a bit can often benefit from a flat-fell seam, just like you'd see on the sides of your jeans. But what if you don't want the seam on the outside of your garment? Well, you can achieve the same basic look with the seam on the inside. This is called a mock flat-fell seam, though some call it the mock jean seam.
The process for putting this seam together is very much like the flat-fell seam, except you work on the inside of your garment. This means you start with a standard seam, sewn right sides together. So if you decide after you've already started sewing that you want a flat-fell seam, and you don't feel like taking everything apart, you can settle for a mock flat-fell seam.
To create this flat and secure seam, press both raw edges to one side. I like to press them toward the back of the garment, but it doesn't really matter. Just make sure you press all your seams in the same direction. It makes everything look nicer in the end.
You should now have the raw edges of your seam allowance together, one on top of the other. Trim the bottom seam allowance to ⅛". Careful. Don't cut the top one, because you'll need that seam allowance to encase the other. Fold the uncut seam allowance around the other and press so that the uncut seam allowance is folded in half and fully cases the edge that you cut. Press firmly so that it doesn't move around on you.
Now to stitch it in place. Topstitch as close to the folded edge as you can, going slow and steady so you don't miss. Also topstitch on top of the original seamline. This will give you a nice finished seam inside and two perpendicular lines of stitching on the outside. All nice and finished with no raw edges visible inside or out.
This is a good choice for sporty garments or garments you want to make reversible. It takes a little work and some precision stitching, but it's excellent practice and is well worth the effort.
Friday, January 27, 2017
Sewing a Flat-Fell Seam
If you've ever seen a pair of jeans, you know exactly what a flat-fell seam is. It's the seam that lies flat on your jeans, totally encased within itself. This seam is strong and sturdy, typically used on sports clothing or reversible garments. Some people call this the jean seam simply because it's used on almost every pair of jeans you'll ever buy. It's a good looking, professional seam. Though it looks complicated, it's actually as easy as any other enclosed seam. If you've ever sewn a bias bound seam, you'll be able to full off the flat-fell seam.
Unlike some of the other seam finishes, you actually have to know you're going to use this seam finish before you ever start your garment. This is because the raw edges of the seam have to appear on the outside of the clothing. To accomplish this, simply sew the item with wrong sides together instead of right sides together, but only on the seams where you want a flat-fell effect. If you're making jeans, you'd probably only do this on the side seams. The inseams and crotch seams are not usually created using this method. Check your favorite pair of jeans and you'll see exactly where the flat-fell is typically used. Of course, since you're making your own garment, you can use the flat-fell seam wherever you like.
Once you have your chosen seams on the outside of your garment, press both raw edges to one side. Usually you would press both edges toward the back of your garment, but the choice is yours. Just be consistent. After pressing, trim the lower seam allowance to ⅛". Fold the upper seam allowance around and under the lower seam allowance. You'll basically be folding the upper seam allowance in half and tucking the lower allowance inside it. Press again, then topstitch through all layers close to the fold, essentially sealing the seam allowances inside themselves. Topstitch once again close to the seamline just to make it all look pretty and that's your flat-fell seam.
This seam is excellent when you have to hide your seams completely, especially for those garments you want to lie flat against your skin. With this type of seam, after all, there are no seam allowances inside the garment to brush against you.
Subscribe to:
Posts (Atom)